Running from GUI
For many developers, a GUI is preferred over command line. To maximize efficiency, a GUI was developed for this test suite tool that leveraged the underlying scripts as much as possible. This means very little duplicated code/effort. Lots of aspects of running the GUI are described in the sections of this chapter.
Starting the Program
Starting the GUI program will depend on how the package is installed/downloaded.
Downloaded binary from Github release page: - In this case, the user will simply run the downloaded binary
Installed via Pip: - In this case, a binary (eplus_regression_runner) will be installed with the package that will allow running the GUI
Cloned the repo for development: - In this case, the user will run the epregressions/runner.py script at the root of the repo
In some cases, a command window is launched prior to showing the graphical interface. This can be ignored. When the GUI launches, it should look similar to this figure.

Screenshot of the GUI immediately after launch
At this point, the program is ready for user interaction to start a run. While using the program, the user has the ability to load and save settings files as they desire, using the File menu.
Test Suite Options
The first tab shows basic test suite options. The top options are simply allowing the user to select the base and mod build folders. The GUI will autodetect which build type is being employed as the user can select between a few types:
Visual Studio build folder
Unix-style Makefile
An EnergyPlus install folder
- The user can then select a few settings:
Number of threads to employ while running simulations
Minimum reporting frequency to limit the amount of output data to process to improve diff speed
Run configuration to specify how the files should be executed (design days only, annual, no forcing)
Selecting Input Files
The input files are selected on the second tab. The user can select files by double clicking them in the top list, and they can be removed by double clicking them in the bottom list. There are also a few selection options for selecting a random set, or selecting/deselecting all.
Running & Canceling Test Suite
Once files have been selected and test suite options set, the user can try to execute a test suite. The first step is that the GUI will attempt to validate the build folder structure, and stop if a missing file or issue is encountered. Once the suite has started, most configuration options are disabled in the GUI. During the run, if many threads are run, the user may experience lag in this program and the system as a whole. The program should still update with messages from the background processes as simulations complete. The user may attempt to cancel the suite at any time while it is running. However, this will only be caught in between EnergyPlus runs, not during a single run. So it may take a few seconds or minutes before the suite operation actually cancels smoothly. A hard close of the program should kill all child processes if need be.
Log Message Interpretation
During GUI operation and while a test suite is running, informational messages are reported to the log messages tab of the GUI. A screenshot of the log is shown in this figure:

Screenshot of the log window of the GUI after a suite was completed
These messages include simple things such as how the GUI has been initialized, or the file list was successfully built. In addition, the underlying suite engine reports back the status of each simulation being run once EnergyPlus has completed and during post-processing steps. Once the test suite is complete, messages are sent to this log as well as to the GUI itself, so that the GUI can prepare itself for the next run if needed.
Last Run Summary & Re-do-ing
When a test suite is completed, the GUI processes the results into a useful high-level results structure. This is shown in the following figure:
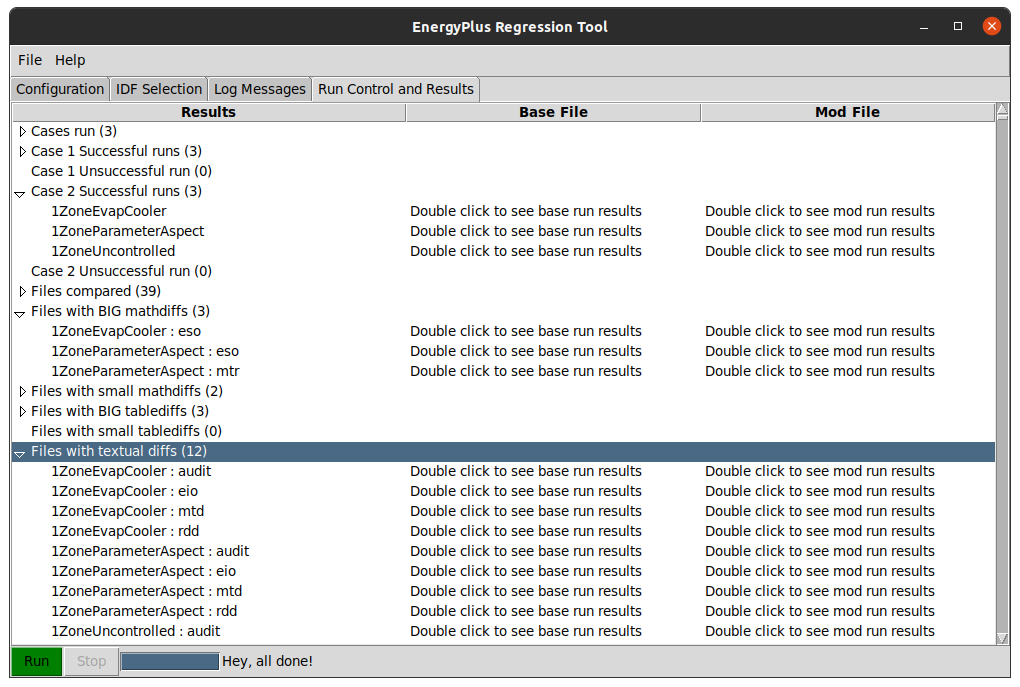
Screenshot of the summary window of the GUI after a suite was completed
The summary includes root nodes, including the following, that are filled with results once a suite is complete:
- Cases Run
This lists all cases that were run for the completed suite
- Case N Successful Runs
This lists all input files that ran successfully in case N (base/mod)
- Case N Unsuccessful Runs
This lists all input files that failed in case N (base/mod)
- Files Compared
This lists all files compared. For a single input file, there could be over a dozen files compared: csv, meter, zone sizing, system sizing, and tabular output, error file, bnd file and other text files.
- Big/Small Math/Table Diffs
Each of these list the files that hit the within tolerance or out of range differences during diff processes.
- Files with textual diffs
This lists all the textual diffs that occurred between the base and mod runs, including changes to the eplusout.[err, bnd, shd, audit, …] files.
Once the file list is populated, each file line item will have two columns where the user can double click that cell and it will open the Files/Explorer/Finder window to the appropriate results folder. The base folder will have the output diff files along with the core results.